
This is part of a series on the RUCKUS line of controllers. To read the introduction and to find other posts in this series, please see the first blog post which can be found here.
What is RUCKUS Cloud?
What I am going to be talking about in this post I have come to discover as being the second version of RUCKUS Cloud. Apparently there was a first version but the point of this isn’t to get into a discussion about what that was or any thoughts on it. It was before my time and all I can comment on is what I know now. The best way I know how to tell the difference between the older version and the current version is the addition of the CommScope name and logo to the WebUI and mobile app as well as code versions that start with version 20.x.y and newer. If you are not seeing that CommScope name and code versions that are older than 20, talk to your account rep about getting on the new platform.
RUCKUS Cloud is an “AI-enabled converged network management-as-a-service” offering from CommScope RUCKUS. Like many networking companies, having a Cloud offering is almost a necessity these days in order to survive. Sure, cloud network management-as-a-service might not be for you, but that’s ok, there are enough customers out there that are looking for this type of service. For me, this was the first RUCKUS controller option I tried thanks to the short window I had to get an AP online and the ease of getting the AP online and an SSID in the air.
As the description suggests, RUCKUS Cloud is a converged management system meaning that it can manage both APs and ICX switches from the same platform. Unlike other RUCKUS platforms the AP models supported by this platform isn’t as plentiful owing to it’s newer code versions that aren’t backwards compatible to APs that are only 802.11a/b/g/n. To figure out which AP (and switch) models are supported you can check out this link here to see if the model you have is supported.
RUCKUS Cloud can have an almost unlimited number of APs and switches, but it does require a Cloud subscription that comes in a 1, 3, or 5 year subscription. The way to really tell if the offering is truly a cloud offering as opposed to a virtual controller (those are coming soon) is by the subscription model. This is similar to licensing and support but with a subscription those 2 items are generally merged into 1 product number. Hardware replacement is a different story but is covered in the data sheet. The other hallmark of a true cloud offering is who maintains the firmware on the platform? If it is you as the customer then it’s a virtual controller, no matter if it’s public of private cloud. If the company you pay the subscription to is the one that maintains the firmware, and the servers the controller is running on, then it’s cloud. In the case of RUCKUS Cloud, CommScope RUCKUS maintains different regions of Cloud controllers so depending on where you are located in the world, there is something “close”.
RUCKUS Cloud has plenty of features to keep most of the users happy, but it is still lacking a couple of the advanced “nerd knobs” that many Wi-Fi professionals want to dig into and adjust. For most customers who don’t know that those knobs exist, they probably won’t miss them. From a feature standpoint Cloud has almost all of the features that customers interested in a cloud controller are going to want, and even some they don’t know that they want yet.
How to set up RUCKUS Cloud
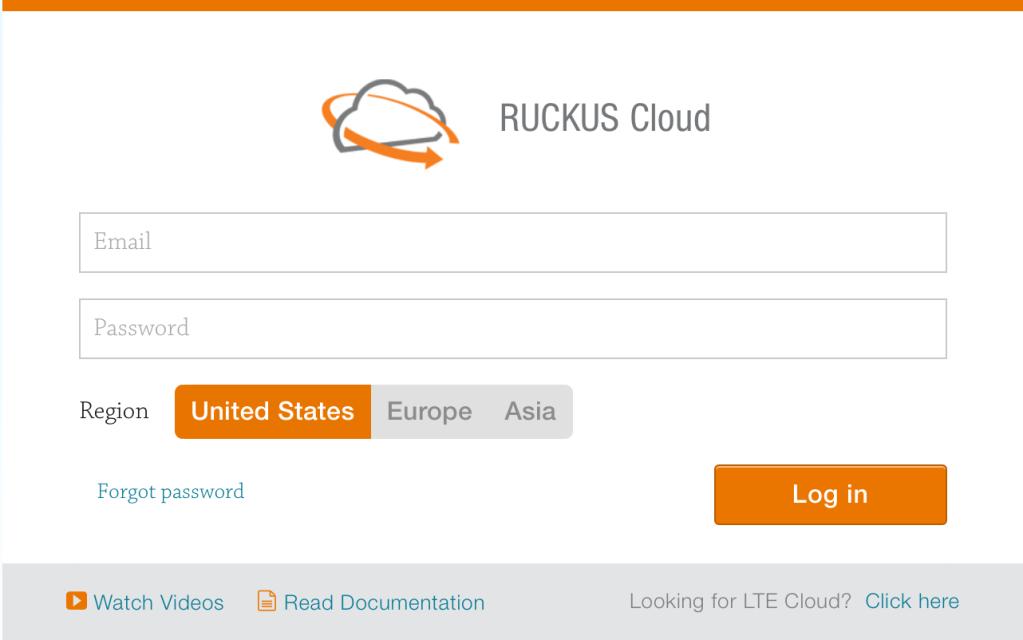
Since RUCKUS Cloud is a subscription service, there isn’t much to do here but to use RUCKUS Cloud you are going to need an account, some available subscriptions, and an AP that is supported. Contact your local RUCKUS partner to set up a demo or you can use the “Try RUCKUS Cloud” link found on the website here. After getting access set up, head over to https://ruckus.cloud to log in. Once logged in, set up and configuration only takes a couple of minutes and the menu on the left side is set up in a way to guide you through your initial config.
Configuring RUCKUS Cloud
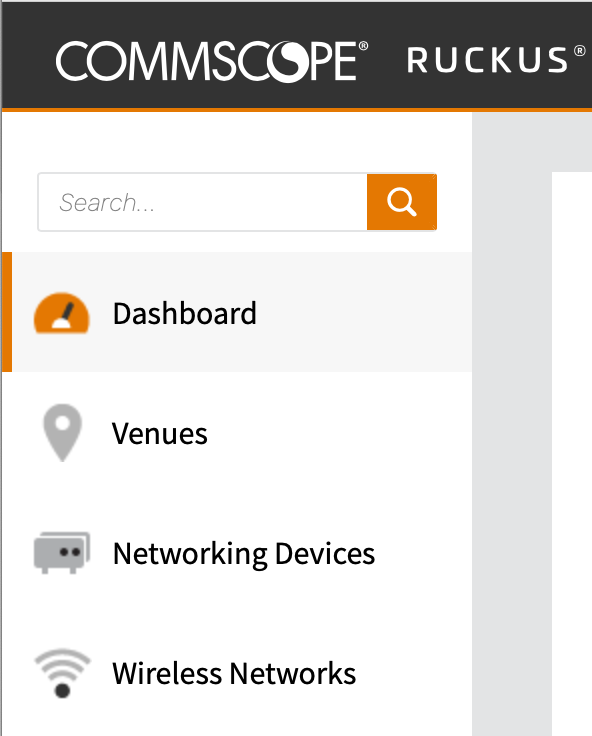
For this section I am going to borrow the process from my friend Shawn Lucas and a video he recently made. The order of operation requires things to be set up in a specific order, but thanks to Shawn who pointed out to me that they put the order in the menu as seen here. Start by building a Venue, then add a Networking Device, and then build a Wireless Network for that device. Creating a Venue can only be done from the WebUI, but adding network devices and a wireless network can be done either by the WebUI or the mobile app. I prefer to add devices via the mobile app and I think you will see why here in a minute but adding networks can be done from either platform about the same.
Creating the Venue from the WebUI is pretty straight forward and basic. Click Venues and then Add Venue in the upper right. Doing this first allows for the AP to have a home, so to speak, when you add that next. Fill in the information (valid Google street addresses are nice, but not necessary) and click Create.
Next is adding an AP to the account. Adding the device via the WebUI is straight forward as well. I’ll explain the WebUI and then show you the mobile app after. On the WebUI select Networking Devices, pick either Wi-Fi or Switch and then Add AP / Add Switch depending on what you want to add. Remember, RUCKUS Cloud is a converged control platform so you can manage both APs and Switches. With only 1 venue that field is populated for you so give your AP a name, fill in the serial number, and click Create. Plug in the AP and then wait.
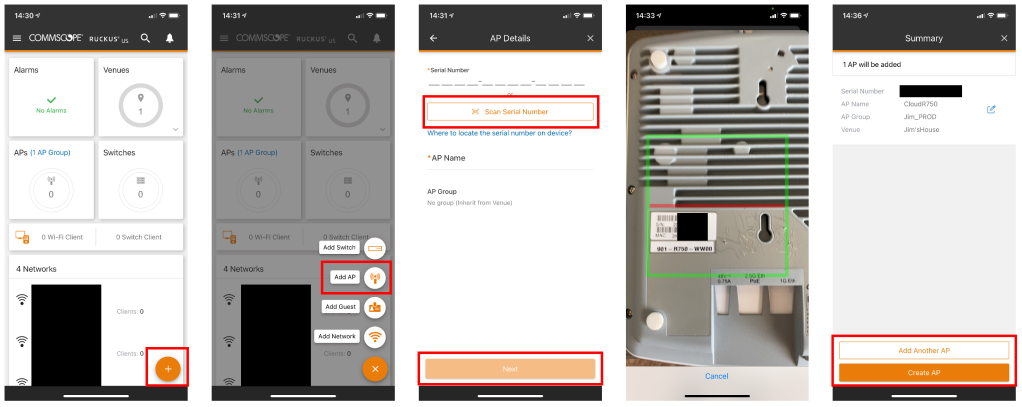
For the mobile app start from the main menu and click the orange + button in the lower right and select Add AP. Select the venue and then either hand type in the serial number of the AP or use the camera on the device to scan the barcode for the serial number on the AP. For me, it is scan all the way! Give the AP a name and then click Next. It will ask you to confirm the details and then you can click Create AP. Plug the AP in and start to create a network for the AP to advertise. Coincidentally, while we are here, clicking the orange + button from the main menu will also allow you to add a switch, a guest user, or a new wireless network. I’m not going to cover that in detail here, but no matter what it is you are trying to do, the WebUI and the app walks you through it so it’s pretty foolproof.
Coincidentally, while we are here, clicking the orange + button from the main menu will also allow you to add a switch, a guest user, or a new wireless network. I’m not going to cover that in detail here but no matter what it is you are trying to do, the WebUI and the app walks you through the process so it’s pretty foolproof.
Now while the AP is powering up, calling out to the registrar website and getting claimed by your venue, go ahead and build a wireless network so it has something to broadcast once it gets online. From the WebUI select Wireless Networks and then in the upper right select Add Network.
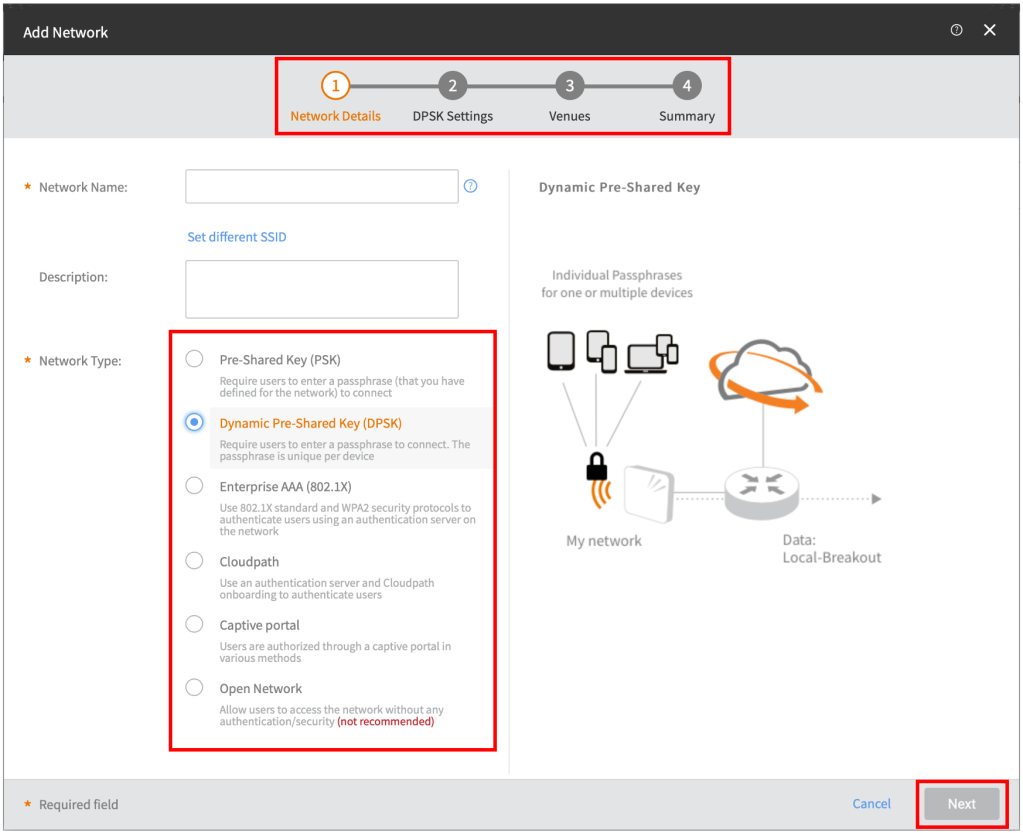
Like I said, most of the process is pretty templated so the average person can get the network online and functioning faster but I wanted to point out a couple of things here. The first is the flow chart at the top. This shows you where you are in the process and allows you to click back and forth if needed. The next is the Network Type. As you click through the options (DPSK shown here) the drawing on the right changes to reflect what that will look like. Want to do a guest captive portal where they use social media to sign on? (I know, I know, this is just an example, leave me alone!) That is built in as well and looks something like this:

Notice how not only did the flow chart at the top changed as I moved from DPSK to Captive Portal the diagram on the right also changed to reflect that type of data flow? This is helpful if you aren’t sure what type of network you want to use or what it is called. Just click through all the options until you find the type of network you want. Easy Peasy.
When you get to the Venues part of the WLAN configuration you need to enable the network and then can pick which AP you want it on, if you want it on both radios or maybe just a single band SSID. You can also set up scheduling from here as well. Only want the SSID available on the weekdays during business hours or maybe just the weekends? This is where you set that.

Once you reach the Summary page you are ready to create the network and get it on the air. Like I said before, if you want to change anything, simply clicking on the flow chart at the top allows you to go back. There is also an Advanced Network Settings in the lower left that I will get to in a bit but if you are happy with what you have, click Create in the lower right and you are done!
I don’t have a switch to add to the platform (it is that new fangled “converged management” thing) but the process is almost exactly the same as adding an AP. Get your serial number, add it to your venue, and then plug it in. The process is there to take care of the rest.
Managing RUCKUS Cloud
As with RUCKUS Unleashed, Cloud also offers managing the network via a WebUI or the mobile app. For my money, the mobile app is a good way to monitor the network, and stand up a quick WLAN if needed (but again, who does that?) but for actual management purposes, I will always default to the WebUI. When clicking on Dashboard on the left side menu, you see a high level status which is nice as well as come quick links to enable adding another venue, device, or network.


What I want to highlight is the “?” in the upper right corner between the alarm symbol and the user information. This is the help center and many times I forget it’s there, only to click on it and go “Hey there! That’s what I was looking for!” Documentation, videos, links to supported devices, even the ability to contact support if you need to open a case. As far as cases go, support is included with the licenses, and be default they aren’t allowed to log in and see your data. All of that is restricted from the company. In order to assist you, support will ask you to click on Administration –> Support –> Allow access to Ruckus support to allow them to check out your system and figure out what is going on. That stays active for 7 days and then automatically disconnects them. You can manually turn that off before the 7 days, but it will kick them out after 7 days. Ask me how I learned that one!
Clicking on the About Ruckus Cloud will show you the code version that you are running on. Since this is a subscription service, customers don’t manage the code version of the platform or the back end hardware the controller is running on. If there are updates or anything like that you will get an email notifying you ahead of time.
About that subscription, and cloud controllers in general. If the platform has any issues where the APs can’t contact the controller, they will still continue to pass traffic and most functions will still work, if they are local to the APs. Things like RADIUS proxy and captive portals will have issues since that is hosted in the cloud, but devices already associated will still function. There are multiple data centers in play on the backend, as you would expect, but sometimes the global internet between your site and those AWS sites might get wacky. It happens.
Now, if your subscription lapses, the AP will still function for a while (I think) but you will lose the ability to manage it or make any changes. It’s not a hard stop when the subscription lapses but if you are anything like me, the idea of not being able to monitor or manage your network is scary enough that I would get that taken care of sooner than later.
Most of the rest you can find by clicking around in the dashboard. There are a lot of cool stats you can see like overall data usage as well as the ability to drill down into individual devices to see more information about that device, including what that device has been doing on the ole’ Interwebs

One final note before I move on to advanced settings and the like and that is radio settings. By this point I have configured my venue (my house) multiple times at this point, and I always forget one thing, and that is the radio configuration. I usually notice this when I walk away from my desk and then start looking at the mobile app. That’s when I notice that I don’t like the channels or transmit powers of my radio interfaces. Problem is I have yet to find a way to manage that from the mobile app. So I have to walk back to my desk and take care of that via the WebUI. Radio settings can be done via the Venue –> Settings for the global venue or can be done via the individual AP through Networking Devices –> Wi-Fi –> Select AP –> Settings Edit in the lower right corner of the resulting window. Set it ahead of time, before walking away from your desk, you’ll thank me later!
Advanced RUCKUS Cloud
One of my first complaints I had when I first used RUCKUS Cloud almost a year ago was it was missing a lot of what I considered “advanced” features. It was something that I complained about. A LOT.
I would like to think that thanks to me that is changing.
*Side note here. I seriously doubt it was me complaining but to make me feel better, I claim it when I’m amongst friends. We are all friends here, right?
With each release that has come out there are more and more advanced features. When I first started using Cloud, and even at the beginning of this post, I said that if the network was being managed by someone who wasn’t a CWNE they probably wouldn’t notice the missing nerd knobs, but if there is a CWNE at the helm, they might notice it. I have to tip my hat to the developers and engineers for maturing the product over time. Hopefully it won’t be too long and all those nerd knobs will be there!
For the most part, what you want to tweak will be located in Wireless Networks –> Select Network –> Edit Network –> Advanced tab. WIPS is still in its infancy and that is located under the Venue settings but I have heard that more of that is coming. No idea how much and when and this is in no way a promise of ANYTHING, this is just me spreading rumors. Back to the network advanced tab.
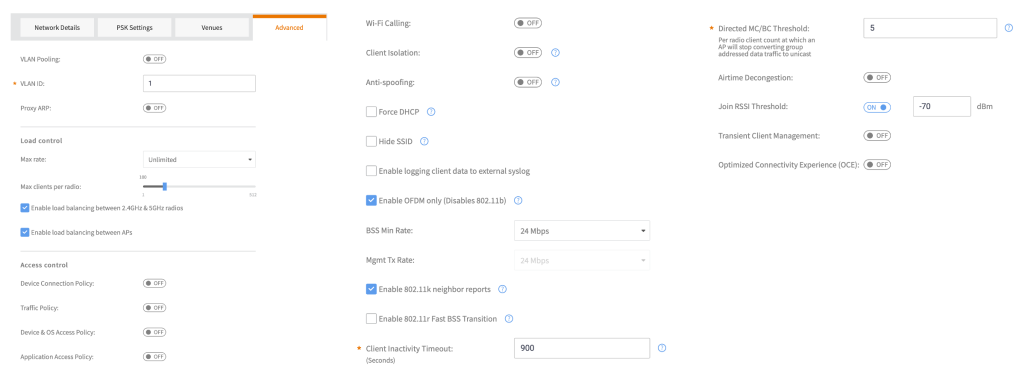
If you are trying to read this on a mobile device, I’m sorry. A couple of things I will point out is the the little blue question marks next to some settings allow you a little more information on that specific setting but if you need more, don’t forget about that question mark in the top bar that I showed earlier. The other thing, which took me a minute to figure out because I’m a tunneling sort of person is the VLAN ID. You might notice that it’s “1”. Rest assured I don’t run VLAN 1 in ANY network I manage. Turns out that if you want the clients associated to that network on the same VLAN as the AP or the native VLAN on the switch port, use VLAN 1 and the switch will tag it with the VLAN set as the native or untagged.
I might be late to that party, but someone has to be later than me, right?
RUCKUS Cloud Final Thoughts

Many years ago I wrote a blog post called “Long Live the Controller” and I still stand by that post. At the time I felt everyone was rushing to put everything in the cloud, and I said then that for some customers that might work for them, but there would always be a place for a physical device in the network that acted like a physical controller. What I failed to take in to account then was the ability of the APs improving to the point that they could manage 128 APs in a given network. Another thing I didn’t know about what the idea of a virtual controller but hosted locally. That’s a discussion for next week. The final thing I have learned is the difference between Capital Expenditure (CapEx) versus Operational Expenditure (OpEx). Many times the requirements placed on the technology design also includes financial restraints like an organization looking to move more towards an OpEx type experience, where subscriptions come into play, thereby almost requiring a Cloud solution.
What I really like about this platform is that I don’t have to worry about getting the thing running. It’s there and waiting for me. Getting APs onboard and running is really simple, and I don’t have to track code upgrades or security patches. Because it’s a subscription platform support is just a click away and there are plenty of links for those who like to read before opening up a TAC case.
Another feature about RUCKUS Cloud that I didn’t touch on before is the seamless integration between the platform and another new RUCKUS offering, RUCKUS Analytics. I’m not going to get into the AI/ML stuff, especially in a series about controllers, but I might write something about it later (after I learn more about it).
For customers or networks where maybe they are running a “lean IT staff” and have many other things to worry about, this is a great option. The platform has continued to improve, and I even learned about some new additions to the platform that have happened while I’ve been busy elsewhere. So tip of my hat to the folks on that team for putting in the work. I also enjoy the mobile app that allows me to monitor the network from anywhere, just in case something goes wrong while I am away. Would I want to use it as my primary method to monitor the network? Maybe not, but I know it’s there if I need it.
Finally, my purpose here isn’t to compare and contrast the RUCKUS Cloud offering to other Cloud services. I am sure that they are all pretty good, and they all have their own strengths. My point with this series it to take my one AP (an R750) and run it through all the different controller options in hopes that it helps people out when they need to decide on just one platform. I can see scenarios where a Cloud controller would be an awesome fit and be the perfect fit, even if in my heart, I will always be a physical controller type of person.
Or am I? Stay tuned for the next installment where I straddle the line between the physical and virtual world.
